Taking basic reference photos of fish.
"Your illustration will only be as good as your references."
This is something I tell myself and my students often. There are basically three types of references. From life, from photo/video or from experience with subject matter. What I speak to in this post is photo/video and is probably the mode of reference realistic illustrators rely on for their artwork most. Below I outline the key points in collecting good references for a simple fish identification at least for my purposes.
General keys:
- Fresh caught fish is ideal. Even better if you just pulled it up and it's flopping on the deck. This helps give an idea of color/pattern and because the fish is not completely dead, it's general body shape is still in a natural state. After hours of sitting in an icy kill bag or cooler with other fish on top, color will fade, fish will get bent and the bumpy ride home will rub skin/scales off. References taken at the cleaning station are not ideal, but if the fish is in good condition these pics can also work.
- In general mature size is also important. The fish doesn't have to be a world record (although that would be great for you and me) but it's nice for it to be somewhere in the middle. If WR is 100lbs then a 40-60 lb specimen would be great. There are things like scaling of eye and brow and ratio to head body that change over time.
Photo tips:
- In focus and at the very least taken on a good phone camera. (Go Pro screen grabs or stills won't cut it for shape and structure.)
- Limit the amount of reflection off the fish so that structure of scales and membranes are not confused with sharp highlights coming off a wet fish. Best if taken in shade. Moving the fish to the shady side of the boat under the gunnel helps. Just be sure the camera adjusts exposure to the fish and not the bits of sun.
Here are the primary shots that are necessary.
1. Head:
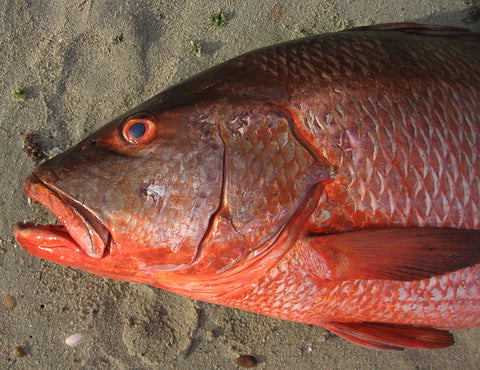
- With fish is laying on side, put something between the fish and the deck near the mouth to lift the head off the deck enough so that the side of the head facing you is more straight on focused view of the eye. A glove, deck rag will work.
- Eye: Ability to see the shape of the lens within the pupil as well as colors around the eye is very important. I always take a close up of eye. Just double check focus as sometimes camera.
- A clear view of scales on cheeks and creases in gill plate and how the gill opening wraps down around the fish. (see above pic)
2. Pectoral fin:
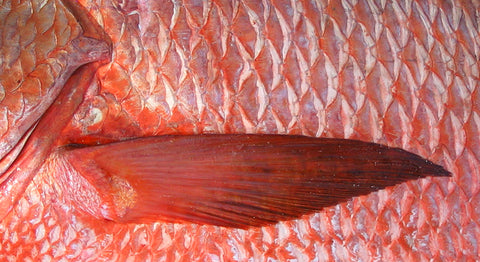
- Lay fin flat against the body, slightly spread. Basically a relaxed position against the body.
- Important to see where the pectoral fin inserts into the body and the muscles and scale structure in that area.
3. Dorsal spines (not all fish):
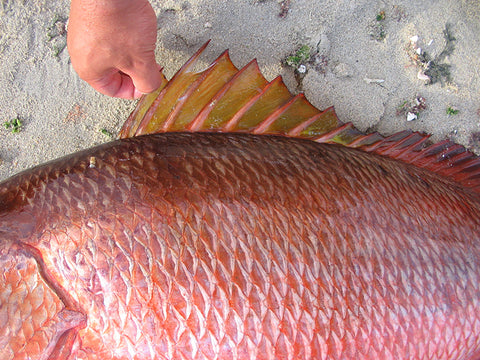
- Pull on first spine to see if you can get the rest of the spines to come out and stand up. Doesn’t have to be straight up and down, but enough so see how many and generals shape and patterning on the membranes in between.
4. Dorsal rays:

- Where spines change to rays, pull on first, second ray or last spine to get the rays to stand up. Hopefully you can get them all to stand up to the point you can see the last ray separate from the body where it inserts.
- It's also nice to get a close up of the rays to see a bit of individual detail.
5. Caudal fin:

- With a flat hand brush fin flat against the surface and gently spread the top and bottom tips so that the fin opens up a bit. Not to much as to seem unnatural, but just enough to show how many rays there are and how they distribute.
- It's also good to have a detail shot of how the scales (if present) change from body to the caudal peduncle to the tail. If the fish has a keel or spines on the peduncle it's good to see detail of this as well.
6. Anal fin:

- Pull front ray or spine on anal fin and see if you can get the whole fin to stand up enough to see where rays separate from body where it inserts (just like dorsal rays)
7. Pelvic fin:
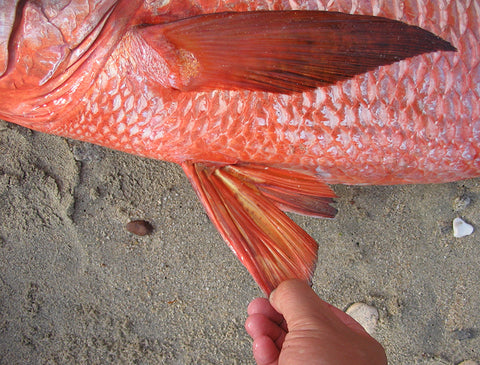
- Pull pelvic fin from the tip out so it comes out at approx 45 degree angle or just to the point right before fins starts to pull away from body.
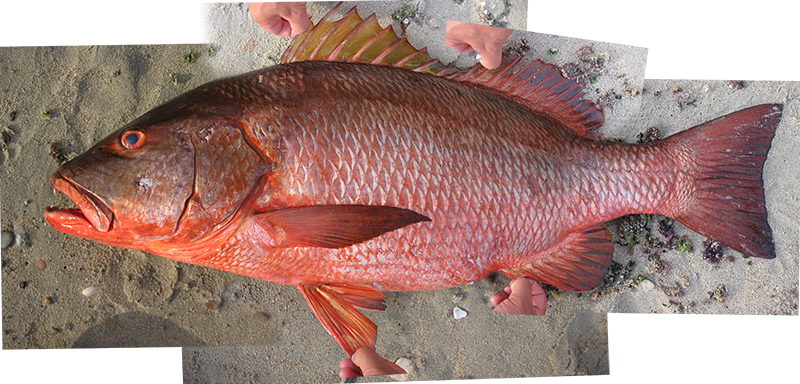
8. Whole body:

- Usually like to get as far above fish as possible then zoom in to crop around whole fish then shoot. If you frame the fish up close there will be a bit of distortion from the lens towards the head and tail. This is important to get relative body positioning for last step. (note: you can see from this pic that the eye position seems like it's on the top of the head. This is because of the angle of the camera and why it's important to have that good head shot.)
- I also take a panorama down the fish starting at the head. One pic per foot is usually good to get good detail on scales and pattern.
What I do with the pics?

In Photoshop I tile all the pics back together so that all the fins are in the correct position for an identification. This is what I draw the basic body plan from.
I've created a page that shows what fish I'm looking for at the moment. If you see one on the list that you are planning on catching and want to help, please follow the above instructions as best as possible. If I use your pics for one of my paintings, I'll send you a signed giclee on canvas of that fish.
-Amadeo
note: The above fish is a 40lb pargo (Lutjanus novenfasciatus) our panga captain Moral horsed up while we were all diving. He was pretty happy about that and I was very happy to get a great reference of a fish that usually beats itself up in caves and on the rocks.
Leave a comment
Comments will be approved before showing up.

